For the majority of people, makeup is a way of experimenting with their look and transforming themselves using a variety of shades and products. But for some, skin complaints and conditions make this process very difficult.
Eczema is a condition in which patches of skin are unable to hold moisture so this causes the skin to go very dry, cracked and sore. It often appears in patchy areas which look almost like rashes, and the skin tends to itch and, in extreme cases, crack and bleed. The skin is usually very sensitive, so usually people with the condition are allergic to certain types of soaps and detergents. This makes it very difficult to find makeup which both soothes and compliments the skin.
When looking for makeup products, it is best to choose products that are designed for sensitive skin. This means looking for products which are unscented, made with natural ingredients, and don't include harsh chemicals such as lanolin, propylene glycol, sodium hydroxide and sodium lauryl sulfate. A common problem with using makeup on eczema skin is the danger of cakey or clumpy skin, therefore it is best to avoid liquid foundation and instead stick to very lightweight mineral makeup. Different shades can downplay flaws; for example, using a very pale (slightly green) shade can reduce redness, but it is important not to use too much product - this only makes things worse! For eyes, it is better to use water-based eyeshadows as powders will simply gather in the dry areas. Also, water-based products are easier to remove with gentle makeup remover. It's best to avoid shimmery shades on dry areas as, again, this will highlight flaws. Pay attention to your makeup tools, also - clean brushes are a must!
Vitilgo is a condition which causes discolouration of certain areas of the skin. It usually appears in very uneven areas and creates a patchy effect on the skin which often grows over time. It is more noticeable on people with dark skin, as there is more of a contrast. It isn't particularly harmful, but it can be very embarrassing, partcularly if the condition is partcularly severe in areas such as the hands, neck or face. However, there are many options now in the beauty industry for makeup which is designed to cover up or camouflage skin complaints such as vitiligo.
Using makeup is a simple and cheap option (as opposed to surgery, which some people resort to) for covering up vitiligo patches. Camouflage makeup comes in a variety of shades and textures, and it's best to choose a product which is light and airy and allows the skin to breathe, and does not make the skin look cakey. The person would choose a shade which matches their original skin colour, and blend it into the patchy areas. Starting from the inside and working outwards, a moderate amount should be applied evenly all over the affected areas. Special care must be taken to blend the edges properly, to achieve a more natural look. When using dyes, it is important not to go over the natural skin colour too much, as this could cause staining. It is recommended that powder is used to set, as this will make the colour last longer and will help prevent the product smudging or rubbing off on clothes or on contact. It is also important to use powder, particularly alongside sticks or liquids, to create a matte effect and to even the skin tone.
October 27, 2011
October 20, 2011
The History of Wigs
A wig is essentially a piece of hair which is fitted to the head for either improving or changing one's appearance or to hide hair loss. Today, a large variety of hair pieces - such as extensions, weaves, etc - are used by people to enhance their hair for fashion purposes, and both natural and synthetic pieces are worn. Wigs and hair pieces are also used extensively in TV, film and theatre to create a variety of characters. However, throughout the ages, wigs have been used for many different purposes. Here are a few examples!
Ancient Rome
In Roman times, hair was seen as sacred and people considered washing, cutting and dressing their hair to be something of a ritual. Wigs were worn by both men and women soared in popularity at the establishment of the Empire - during Livia's reign (58 B.C.-A.D. 29) more attention was paid to hair and how it could be styled. Empress Messalina (A.D. 17-48) was famous for her yellow wigs, which she would wear when she visited brothels. In fact, Roman prostitutes also wore yellow wigs to assert their status and profession. Women in Rome usually wore wigs to look younger and improve their appearance, but men wore them to hide their age - Julius Caesar (100-44 B.C.) wore a wig and laurel leaves to hide the fact that he was balding.
16th Century
By the 16th Century, wigs of varying shapes and sizes were an every day items for ladies, and they were starting to become more popular with men. This was largely due to the influence of Queen Elizabeth I, whose reign began in 1558. Women dyed their hair red to emulate the Queen's natural hue, and her extensive collection of wigs influenced a lasting trend. Catherine de’ Medici (1519-1589) even paid a woman to provide hair for her daughter's wig, and Mary Queen of Scots (1542-1587) amassed an even larger collection of wigs than Elizabeth I.
18th Century
The popularity of wigs maintained throughout the start of the 18th Century. People even rioted in Caen, France because of a flour shortage - aristocrats were using flour to adorn their wigs, but it was badly needed to make bread. The Death of King Louis XIV of France, however, changed the trend for grandiose, extravagant wigs to more natural-looking ones. Louis was famous for his hair - he began to bald prematurely, so he was never seen without it. He even hired over 40 wig makers to get it right, and adorned it with perfume and powder. People began to copy his style and, in contrast to today, looking old was 'in'.
By Louis' death, however, people were more interested in blending wigs with their natural hair to create a more natural look. Wigs gradually started to get smaller, and the toupee was born. This new trend had a very negative effect for wig makers - there was even a law pass to make sure men bought and wore wigs, as more and more men were favouring their natural hair. Wigs quickly began to be a symbol of the aristocracy and, by the beginning of the 19th Century, wigs were only really worn by elderly or conservative men.
20th Century
Wigs made a comeback in the mid-20th Century. They were worn by Hollywood actors and actresses and people who wanted to disguise hair problems. Their convenience made them easier than ever to wear and maintain - many women took theirs to the hairdresser to be washed, coloured, styled, etc, and it even became possible to buy pre-bleached wigs. By the 1960s, the popularity of The Beatles came with new trends in hair, and more people wore wigs in order to emulate their Mod-style haircuts. Wigs were no longer stigmatised or worn only by select groups, they were once again a fashion statement and continued the trend for copying hairstyles of respected figures - which was, in the case of the late 20th and early 21st Century, celebrities.
Wigs are still used extensively today, in fact it is more common than ever to see people - particularly women - wearing some kind of hair piece to enhance their natural style. They are also used greatly in fashion, from commercial to couture, to create a variety of modern looks. As technology progresses, I imagine wigs will continue to grow in popularity and new styles and techniques will be developed.
Ancient Rome
Julius Caesar |
16th Century
By the 16th Century, wigs of varying shapes and sizes were an every day items for ladies, and they were starting to become more popular with men. This was largely due to the influence of Queen Elizabeth I, whose reign began in 1558. Women dyed their hair red to emulate the Queen's natural hue, and her extensive collection of wigs influenced a lasting trend. Catherine de’ Medici (1519-1589) even paid a woman to provide hair for her daughter's wig, and Mary Queen of Scots (1542-1587) amassed an even larger collection of wigs than Elizabeth I.
18th Century
Louis XIV |
By Louis' death, however, people were more interested in blending wigs with their natural hair to create a more natural look. Wigs gradually started to get smaller, and the toupee was born. This new trend had a very negative effect for wig makers - there was even a law pass to make sure men bought and wore wigs, as more and more men were favouring their natural hair. Wigs quickly began to be a symbol of the aristocracy and, by the beginning of the 19th Century, wigs were only really worn by elderly or conservative men.
20th Century
The Beatles |
Wigs made a comeback in the mid-20th Century. They were worn by Hollywood actors and actresses and people who wanted to disguise hair problems. Their convenience made them easier than ever to wear and maintain - many women took theirs to the hairdresser to be washed, coloured, styled, etc, and it even became possible to buy pre-bleached wigs. By the 1960s, the popularity of The Beatles came with new trends in hair, and more people wore wigs in order to emulate their Mod-style haircuts. Wigs were no longer stigmatised or worn only by select groups, they were once again a fashion statement and continued the trend for copying hairstyles of respected figures - which was, in the case of the late 20th and early 21st Century, celebrities.
Wigs are still used extensively today, in fact it is more common than ever to see people - particularly women - wearing some kind of hair piece to enhance their natural style. They are also used greatly in fashion, from commercial to couture, to create a variety of modern looks. As technology progresses, I imagine wigs will continue to grow in popularity and new styles and techniques will be developed.
October 13, 2011
Fantasy Makeup
1.) Pan's Labyrinth
To create The Pale Man's hands for Pan's Labyrinth, we would use a mixture of prosthetics, wax and makeup. Obviously I'm still a beginner and there are probably loads of fancy materials that the movie makeup artists use that I'm still not aware of, but it could be done simply using wax. First, I would apply the eyes to the hands (possibly by glueing them down with eyelash glue), then, for the eyelids, apply derma wax to the top and bottom of the eye, and blend thoroughly. This would also help hold the eye in place. From there, the skin could be painted accordingly. For his fingers, I assume they've used prosthetic pieces to elongate his fingers, and painted them black to give a really creepy effect.
2.) Hellboy II: The Golden Army
To achieve Princess Nuala's look from Hellboy II, a very pale foundation would be applied. Her eyebrows would either be bleached then covered with foundation or a layer of wax would be applied to hide them. Then, she would be fitted with coloured contact lenses and brown/sand eyeshadow would be used on her lids and extended up to the eyebrow and across to the temple. A slightly more orangey plum colour has been applied in the corner of her eyes and extended down to give her an ethereal look. Her eyes are also lined along the upper and lower lashlines with a slightly darker brown to define her eyes. To make her cheekbones stand out, a dark brown colour is used to give the shape of her face more definiton. To create the markings on her face, the makeup artist will have used a very thin brush to apply, and set the whole face with powder to remove any shine.
3.) Star Wars: Episode II - Attack of the Clones
To create Shaak Ti's look, the entire face and neck would be painted red, leaving two largs ovals around the eyes to fill in the white area and the red marks above her eyes. The eyes themselves are left almost bare, with just a little reddish-plum eyeliner on her lower lashline - this makes her black contact lenses really stand out. Her cheeks are shaded with dark shadow to make her cheekbones really stand out - this also makes her eyes look bigger. Her lips are lined with a similar shade, and filled in with a pale lip colour. A large part of this look involves jewellery - as you can see from the picture, there are chains that go round her cheeks and meet in the middle of her forehead on a large pendant. These are attached to prosthetic spikes on her hairline, which would be applied with some kind of adhesive to keep them in place. Her horned headpiece covers her hair, which would be secured to the head and hidden under a stocking cap. The headpiece is probably made from plastic, foam or silicone (something lightweight) and painted accordingly to finish the look off.
Character Makeup - Straight Theater 1
A few weeks ago I did a Straight Theater look on Kirsty but I didn't get the chance to take photos because I didn't get it finished, and it didn't turn out too great either! So I did one on Melissa on Monday, which Bella said was good enough for a pre-assessment, which is good news. Before I show you my photos I'll explain a bit about Straight Theater makeup.
Straight Theater is the same idea as Straight TV makeup - a natural face which is meant to represent a more refined version of the person we're looking at. It is not meant to look like any kind of character, it is essentially just a natural face. However, the makeup always has to be a bit more intense for Theater because, unlike TV, the audience is looking at the person from quite far away. Here are some examples of a Straight Theater face:
The following is my attempt at a Theater face:
Melissa's skin tone is very fair so I got off to a slow start trying to find the right foundation colour for her. The one I used was maybe a little too pale, but once I applied it, blended it and finished it with powder it looked good. You can see from the top picture the two lines I mentioned prevously - they would be clearer if Melissa wasn't smiling but you can see how the two lines extend out beyond the eye and make them look bigger.
I was happy with the look and the fact that I managed to complete it in a good time, but Bella suggested that next time I use a slightly darker shade of red on the lips (more of a brick red rather than pinky red) and blend the eyeshadow a bit more, but I was happy to hear that she thought it was good enough for pre-assessment :)
Look out for my assessment, coming soon!
Gill x
Straight Theater is the same idea as Straight TV makeup - a natural face which is meant to represent a more refined version of the person we're looking at. It is not meant to look like any kind of character, it is essentially just a natural face. However, the makeup always has to be a bit more intense for Theater because, unlike TV, the audience is looking at the person from quite far away. Here are some examples of a Straight Theater face:
Theater makeup has to be a more intense version of TV makeup, so we use foundation shades that are slightly darker (just a shade or two) than the person's natural skin tone. We also enhance the blusher and lips, and for the eyes we line them in a specific way - in order to give the illusion of larger eyes, we line the upper lashline with either dark brown or black and extend it out from the eye. The same is done on the lower lashline, and again the line is taken a bit further out from where the natural eye line ends. We then use a light shade of eyeshadow (either white or cream) and colour in between the two separate lines to give the illusion that the white of the eye is extended. It is a good effect as the eyes appear much larger from far away.
Close up, the Straight Theater face looks a bit 'too much', and even a bit Drag Queen-esque, but this is needed because the actor is standing far away from the audience. It is important to enhance their features even more so they don't look washed out or fade into the background.The following is my attempt at a Theater face:
Melissa's skin tone is very fair so I got off to a slow start trying to find the right foundation colour for her. The one I used was maybe a little too pale, but once I applied it, blended it and finished it with powder it looked good. You can see from the top picture the two lines I mentioned prevously - they would be clearer if Melissa wasn't smiling but you can see how the two lines extend out beyond the eye and make them look bigger.
I was happy with the look and the fact that I managed to complete it in a good time, but Bella suggested that next time I use a slightly darker shade of red on the lips (more of a brick red rather than pinky red) and blend the eyeshadow a bit more, but I was happy to hear that she thought it was good enough for pre-assessment :)
Look out for my assessment, coming soon!
Gill x
Special Effects - Burns Assessment!
This week I did my assessment, and again did a hand burn, but on the opposite side because I felt that the oils in the palm of the hand (that I did on Debbie - see previous post!) made it difficult to blend the colours. My scenario for this was a bit more simple - Holly's house was on fire and she got burned while trying to escape. I wanted it to look really charred and burned, and Mo said the end result was very realistic! Take a look:
This was, by far, my favourite burn - I'm glad my assessment went so well! I have another picture where I wrapped a bandage around her hand but the one above is better quality. As before, it is a mixture of greasepaints, latex, collodium and gelatin. I felt like I really got the hang of tearing and peeling the latex - it turned out exactly the way I wanted, and I really loved using black greasepaint on the peeled areas to make it look really gory. Although at one point, I almost cut Holly's real skin with the scissors - that latex sure is realistic!
I'm really pleased about passing my burns assessment. Next we're moving on to cuts and bruises, so look out for that!
Gill :)
Hairdressing - Dry Setting
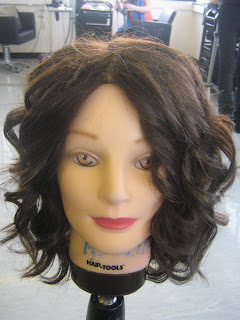
In hairdressing we were working on new techniques for Dry Setting. This basically means setting the hair without washing it, so in this example I'll cover curling with straighteners, and Velcro rollers. I did both of these on a tuition head, although I'm eager to practice on one of the girls soon!
Curling with straighteners is really simple and creates a lovely result. As before, how tight the curls are depends on the size of the sections. I was going for loose curls so I used slightly larger sections. Take a look!
The style was achieved by simply starting at the root and twisting the straighteners so the hair wraps round, then pulling it through the hair slowly. Because my model's hair was quite long, I rolled the straighteners back up when I got to the end of the hair, to create a little extra curl. The hair turned out really nice, I think this style would be good to style further, into an updo, for example.
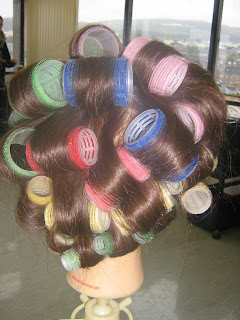
We then moved on to Dry Setting using rollers - the choice was to use either Velcro or heated rollers, however I chose velcro. I had never used rollers before and Elaine made it look so easy! It was a bit fiddly at first but I got the hang of it after a while. This technique is really quick and simple - the rollers stay in by themselves, and they can be left in for as long as needed. This is the work in progress:
As you can see, the rollers come in a variety of sizes. My model's hair was quite short so for some areas I had to use smaller rollers. But the desired effect is to create lift and volume in a short period of time, so once I had sprayed the head and left it for about 20 minutes (while I went to get a cup of tea) here's how it turned out:
Originally her hair was quite flat, but the rollers gave the hair a noticeable lift. This look could be used for daytime or night time, it's a really quick technique and turns out really nice!
While we were in class yesterday, Elaine told us about Unconventional Setting - this is basically setting the hair using unusual products such as Coke cans, pencils, rulers, rags, etc. Different looks are achieved depending on what is used, and we're going to be researching this for the next few weeks before trying it for ourselves. I decided to have a go at creating zigzags with a pin while there was time left in class. Using a U-shaped pin (the kind used to hold rollers in place), I took small sections of hair and put the pin at the root, then I wrapped the hair round the legs in a figure of 8 motion, and pulled it really tight. I then set it by holding the straighteners on the area for 10 seconds, and when I took it out it looked crazy!
I did it a few more times and it came out really well - it's similar to crimping but obviously takes longer. To do this over her whole head would take ages, but I really love the effect!
The real problem came when I tried to brush the style out, however....
With one sweep of a comb she look like she'd just licked a socket...I used a brush to try and flatten it down but it just got bigger and bigger. There wasn't any time left in class so I just had to abandon all hope and put her back in the bag. Apologies and good luck to whoever gets this head next!!
Ooops...
Gill :)
History of Makeup - Native Americans
Makeup has come a long way through the ages, and in different cultures people used different techniques and materials to achieve their looks. The majority of early products were made from natural ingredients, such as berries, beeswax, egg, ash, flower petals and even animal blood. Some people - most famously, Queen Elizabeth I - would even use dangerous materials such as lead to make their skin pale, which would pose serious dangers to their health. Other toxic materials used included mercury and arsenic, and in 16th Century Europe, women even bled themselves in order to make their skin pale. Beauty really was pain for them!
However, for a lot of cultures, makeup was used to define social/military status or even to assert their ferocity. This is mirrored in nature - animals use the markings on their skin to their advantage, whether it is for hunting purposes or to defend themselves against predators.
For Native American tribes, cultural face painting was used since ancient times and each tribe had different patterns and designs which were unique to them. It is an important tradition which allows the people to connect with their heritage, tell stories and to assert their social standing and power. They used all natural products to create their looks - a common tradition for Native Americans, as they worshipped and appreciated nature - and a variety of items such as roots, berries and tree barks were used to make dye. They also used clay, mud, plants, copper ore and even duck droppings, and these were chosen because of the variety of colours they provided. The artists would simply add warm water to the products and apply them to the face and body using brushes, again made from natural materials such as willow sticks, chewed cottonwood or even buffalo bone.
Colour was a very important element when it came to face painting - each colour had a symbolic purpose, and their placement on the face helped tell the story. Red was the colour of aggression, danger and war. White, as you may guess, symbolised peace. Black was the colour of living, and was worn during war preparations. Green was worn under the eyes and was believed to give the person night vision. Yellow, interestingly, was the colour of death and was worn when a person was in mourning, and on men it conveyed that the man had lived a long life and would fight to the end.
These colours would be applied in a variety of patterns, which would range from a few lines to the whole face being covered.
To us, makeup may seem like something which is used to make the wearer look beautiful, but across different cultures it holds varied meanings. I am really interested in Native American culture, art and literature, and to them makeup holds something which lies beneath the surface - it tells the story of their lives and the lives of their ancestors. This is really inspiring to me :)
Gill x
October 10, 2011
Class Rep!
Today I volunteered to be Class Representative for the A group alongside Debbie. If there's anything you guys need to talk about - any issues, problems, suggestions, etc - then drop me a message or have a quiet word with either of us after class :)
Gill x
Gill x
Subscribe to:
Posts (Atom)