November 18, 2011

Wig Making - Blocking and Setting

Last time, I explained how to block a wig so it can be washed and set. I'm really getting the hang of blocking - I can do it quite quickly now!
Once the wig is secured tightly to the block, it is then washed. It is done normally with shampoo and conditioner, but you have to be careful not to completely submerge the malleable block. It is protected with cling film, but if water gets in the sawdust starts to go mouldy and the block loses its rigidity.

Here is my blocked and washed wig:
 Next, we set the wig using metal rollers and stonkers to secure them in place. Metal rollers are used because the set is dried using a wig oven, so plastic materials would melt. The metal ones are also better at holding heat. Obviously, if we were setting a normal head we wouldn't use stonkers to secure the rollers, but since this is just a sawdust head so we aren't hurting anyone!

This is the wig once rollers have been fitted:
This is a traditional brick set, but depending on what character is trying to be created, different setting techniques can be used. I placed my head in the wig oven for about 20 minutes, then when I took it out and removed the rollers there were lovely curls all over the head :)

Not bad for a first attempt!

Gill x

Character Makeup - Theatre assessment

This week in Character class we were using the time to catch up on assessments that we had missed, so I decided to do my Straight Theatre assessment. I found the Theatre makeup more difficult to do than the TV makeup because you have to enchance the features to a greater extreme, as people are looking at the actor from a greater distance. But you have to be careful not to take it too far. The first time I tried this the skin was too orange, and my model looked like she'd been Tango'd!
With practise though, I managed to get the hang of it - even the intricate and fiddly eyeliner on the top and bottom lashlines. Here is the finished result, on Melissa:
 I'm happy with how the look turned out, now all I have to do is the Straight TV and Theater looks on a male model. But that will have to wait til another catch up day!

Gill :) x

Hairdressing - Finger Waves part 2!

I'm just going to post up the picture here and let it do the talking...
Compared to my attempt 2 weeks ago I'd say those are some pretty dang impressive finger waves!
I asked my aunt (who is a hairdresser) to go over it with me and show me in more detail how to do it - she was really helpful and went over it several times before letting me try it, then guided me when I got lost. It was great and I couldn't wait to get back into class to practise it, and my wee tutorial definitely paid off! I still need some more practise at it, but I'm so much more confident doing it now :)

Gill :) x

November 10, 2011

Special Effects - Cuts & Bruises 2

This week in Special Effects class was our last practice before next week's assessment. The assessment is a car accident scenario, so Mo was encouraging us to visualise the injuries we were creating in a realistic mindset - in other words, the injuries have to connect and work together. It wouldn't be realistic to have random injuries dotted over the body, because in a car accident there would be a specific point of impact on a certain side of the body, and is this which we have to try and create. Last week, for example, Mo praised Debbie and myself for creating injuries that had a story behind them and worked together.

I decided this week to create the illusion of a broken bone, because I feel I'm quite confident creating cuts and bruises. I haven't decided what kind of injuries I'll be doing for my assessment yet - more research is required! - but I felt I had to practice something different to give me more options. So I created a broken wrist on my glamorous model, Euan. Here it is, with and without flash:
I wanted to make it look really swollen, so I created the broken part with dermawax, and blended a flesh coloured tone over the top, and a dab of white right in the middle to give the illusion that the bone is pressing against the skin. I added mostly red, purple,blue and green greasepaints around the swelling to make it look really sore and bruised! It was difficult to blend around the wax without accidentally moving it or smearing bits, but I found that it was easier to mix the colours using a brush and sponge rather than my fingers.

I was happy with the outcome and Mo said it looked very realistic, so I feel it was a success!

Next week we'll be down in the car park with Police tape and a bucketload of fake blood to create our accident scenario...Stay tuned for the pictures!

Gill :) x

November 07, 2011

Character Makeup - Halloween assessment!

This week I passed my Halloween character assessment! I decided to do the ventriloquist dummy, because I felt it was more adaptable than the witch. Also, I felt that the witch went pretty perfectly, whereas the dummy needed some improvement, so I gave it a go and it worked out really well:
I feel like I captured the same effect as last time, but overall it's just more refined - last week the eyelashes, eyebrows and the lines down the chin were a bit wobbly and messy, but I managed to keep a steady hand and do them better this time. Also, I tidied up the shading down the nose, and I made the lips narrower and lined them with the same shade that I used on the nose, to create more definition. Overall I'm really happy with how it turned out, I was quite nervous so I'm glad I managed to pass the assessment!

Gill :) x

November 04, 2011

The Curriculum for Irrelevance.

Morven came into class the other day asking the average age of the class. We range from 17 to 29, and we decided that the average (roughly) was 21 or 22. As someone in the higher end of the age bracket - and technically a mature student - I don't feel the Curriculum for Excellence applies to me, as it is mostly aimed at children and young people between the ages of 3 and 18. In my opinion, it bears more relevance to a young person's life while in school and just after leaving.

I think the scheme is something which is mostly relevant in school, as it is a structured plan that ensures a varied and enriched learning experience to guide young people through their education. I totally agree that our learning at college does all this and provides us with a dynamic experience, but because it is further and higher education, I think the learning process is more in the hands of us, the students, and we are responsible for our own progress and effort. At school it was obvious that the teachers were teaching with some kind of official directive in mind (a lot of the time I felt I was learning how to pass exams and fulfil certain criteria, instead of learning skills for the real world), but at college we aren't as spoon-fed - if we miss class or don't do the correct work then it is entirely our fault and we are responsible for catching up and improving. This is why I think that learning about the CfE is irrelevant on a higher education course, and why I don't feel it will benefit me to spend time writing about it on my makeup blog, as it is a place where I like to prove my skills, evaluate myself and display my research.

Saying that, I'm happy to talk about my experiences at college and how I'm progressing, because I'm using this blog for self-evaluation and I think a big part of my course is being able to communicate my expressive side.
I love my course - I find it extremely fulfilling doing what I love every day, especially now I have figured out what it is I want to do! Creativity is my passion, and I always wanted to be in a profession in which I get to express myself every day and make a living out of it! I feel like I'm getting more confident creating the looks we're asked to do, and I think the idea of collecting research is really helpful. I think my tutors are approachable, friendly, and provide the right amount of constructive criticism. I also appreciate that they can be firm when they need to be. I see them as important contacts, and hope to be as successful as them one day.
A big part of this industry involves working with many different people, so I think it's great on the course that we're encouraged to talk to everyone and work with each other. For the most part, I get along with everyone in the class - we support each other and are patient and honest when it comes to each other's work.

I'm really enjoying it so far and I can't wait to continue on in the new year :)

Gill x

November 03, 2011

Hairdressing - Finger Waves

Meet Rhonda.
Rhonda and I don't get along. I'll explain why soon.

Finger Waves is a style which was highly popular around the 1920s, 1930s and 1940s. You might have seen it in films such as Chicago and on movie stars of the era such as the beautiful Clara Bow. It has increased in popularity recently, and many celebrities including Drew Barrymore, Christina Aguilera and Dita Von Teese have worn the look to red carpet events. It creates a stunning vintage look, reminiscent of flapper girls and the golden age of Hollywood.
To create them, all you need is a tail comb, massive quantities of gel and your fingers. The technique involves wetting the hair and covering it in gel, then sectioning it off. Section by section, the waves are created by pulling the hair forward and back in an S-shape with the comb, while holding bits with your fingers and gradually moving down the hair shaft, holding and shaping using your fingers and the comb. I'm not going to lie, it is as difficult a technique to pick up as it is to explain - I found it really difficult to get my head round the process, and I didn't actually manage to do any in class. Elaine quickly showed me how to do one but I don't feel like it was explained properly, so I just got more confused by it.
This is where Rhonda comes in. I always name my tuition heads in hairdressing class, because I find it easier to shout at her when I'm frustrated if she has a name! And this...This was the most frustrating class so far. Elaine was aware that many of us would find it difficult, so she kept telling us to breathe and walk away, which I had to do at one point!
Rhonda's hair was really thin, so when I combed it, it started coming out in clumps...I put it down to her just having had her fair share of styling, and dampened/gelled her hair. When I moved the comb through it this time it went into crazy, frazzled curls. It became evident when I eventually gave up and washed her hair that it was totally ruined by products and styling tools. Her hair was completely matted and I couldn't even get a brush through it!

I took this, at her worst moment. Observe the poor excuse for a finger wave, combined with frazzled hair and a comb which looks like it's trying to hang itself:
I took this picture when it was still funny - but soon I just got angry. I don't normally get so frustrated to the point of walking out of class, but I didn't feel like I had been given any direction. This is well-known as a very difficult process that needs to be explained slowly and requires lots of practice, and I felt like this was lacking in class. Luckily though, my aunt is a hairdresser who comes to my house every 6 weeks, so after I got my fringe trimmed she used my mum as a model to show me how to do it. She took it really slowly, step by step, and got me to do each part after she had showed me a few times. I found that at times I went blank and lost it, but by the end I managed to do one that she said was pretty perfect :) When she left I felt much better about it, and I'm actually looking forward to trying it again. I think I just need lots of practise on a real head, as opposed to a frazzled tuition head like Rhonda.

Next time I'm going to keep my cool, remember the steps and do it well. Rhonda and her smug face better keep their distance.

Gill x

Special Effects - Cuts & Bruises 1

Now we've all done our burns assessments, it's time to move on to Cuts and Bruises in special effects class, although this week I just practised bruises. This is a really interesting topic, because bruises in particular come in all shapes, sizes and colours, so it's fun to lose yourself in it and see what can be created! It's also good to practice on different parts of the body, and I decided to try doing a 'black eye'. This can be paired with cuts around the nose and lots of fake blood to create a very realistic broken nose, but due to time constraints I just did the eye. But before I post my work, I'll talk a bit about bruises and how they can be created with makeup.
Bruises are minor tissue damage under the skin, caused by blunt trauma. The discolouration of the skin is evidence of broken capillaries, damaged veins and internal bleeding in the surrounding tissue. A lot of the time, bruises aren't particularly life-threatening - although they can be very painful - but they can vary in severity in terms of tissue damage.
Creating bruises with makeup is realtively simple - all you need is a soft sponge, a stipple sponge, a bruise wheel and your fingers and it turns out really effective! As you can see from the pictures, many colours are used and different levels of severity can be created.

Last week the lecturers were going to a meeting so we didn't have very long to practise, but I managed to do a bruised eye on Debbie, which Mo said was really good. I'm really happy with it!
I used a mixture of purple, red, brown, black, navy and green to get the overall look - I blended it in mostly using my fingers, but I also used brushes and a sponge. I was trying to make it look really fresh and sore, and I think I managed to capture that! I also used white under her eye to highlight, and make it look really swollen - a technique I learned in Character class!

For our cuts and bruises assessment, we have to recreate an accident scenario, so I've had that in mind while practising. We have to do both a face and body contusion, so this week I tried to incorporate the two. I worked with Debbie again and we came up with a scenario of our own - we were in the car and she crashed because she was dancing at the wheel, and we both got pretty bruised and battered! Debbie gave me a bruised eye, cut nose and a big graze on my forehead which had glass in it. She also did a huge graze on my arm to make it look like I had injured it shielding myself from the crash. Pretty creative!

Here's my work on Debbie, with and without flash:
I wanted to make Debbie look like she had a broken nose, so I bruised both of her eyes and added some pro blood coming out of her nose. I made the bruise darker right in at the corners of her eyes and down the nose to give it a really swollen effect. I figured she'd hit her head on the dashboard, so I added a large, deep cut on her eyebrow bone and made it look really sore by mostly using reds in that area. I added plenty of wound filler and fake blood to add to the realism.
I also decided to give her bruised/grazed knuckles to make it seem like she'd scraped them on some glass in the car crash. I'm really happy with how it turned out, particularly because I don't feel very confident with the dermawax yet.

I find the cuts and bruises to be a bit more difficult than the burns because they are more technical - colour and placement are really important, and the cuts and bruises have to work together to make it look realistic. I felt like this was my best cuts and bruises practise so far, and Mo gave me good feedback on my competent use of colour and overall realism. She even used mine and Debbie's work as an example of what everyone should be doing - she wants us to stop playing it safe by doing small cuts and bruises, and instead get into the accident mindset. Her advice was to think big and to combine the facial and body injuries, to apply to an accident scenario. I couldn't be happier with how it all went!

Gill :) x

Hairdressing - Unconventional Setting

In Hairdressing this week we were having a go at unconventional setting - this basically involves setting the hair (dry) using unusual products, such as Coke cans, pencils, rulers, etc. We're being encouraged to think outside the box and create a look with objects found around the house, which really interests me because I like the creativity involved!
We use a variety of items - wrapped in foil if they aren't fire-proof! - along with hair straighteners to set the look, and yesterday I practiced with a makeup brush on Leeanne's hair. I thought a makeup brush would be good to use for our overall looks, because I like the idea of using the same tools on the model's face and hair.

At first I found it a bit fiddly, because I had to wrap sections of her hair round the brush and hold it in place while setting, and it was hard getting my stride at first, but once I got into it I found it to be fun and it turned out really pretty!
Leeanne's long hair was perfect to practise on, and the technique gave her hair a wavy/tousled effect. I think the style would hold better and for longer with some kind of setting spray or mousse. I plan on trying a few different items and experimenting with different looks - I've got a few ideas up my sleeve!
Unconventional setting is really fun to do because the items can be used in different ways, so you're never sure what the hair will turn out like, and all kinds of crazy effects can be created!

Gill :) x

Wig Making - Blocking

In wig making class this week we all moved on from the wig wraps and learned how to block a lace front wig so it can be set and dressed. This process involves securing the wig to a malleable block so it can be shampooed, dried and styled to whatever look is trying to be achieved.

First, we start by collecting our resources. For this we need:
  • A lace front wig
  • Malleable block - this is a head-shaped block stuffed with sawdust. It is soft to touch but firm inside as the sawdust is packed together. The wigs are pinned on to it for washing and dressing.
  • Cling film - The whole block is covered in cling film before the wig is washed. This protects it from water damage.
  • Lills - also known as dressmaking pins. Small, thin pins used to attach the wig to the block.
  • Stonkers - large, longer pins used to hold the wig in place on the block. They can be taken out onces the first few lills have been inserted.
  • Galloon - a ribbon-like piece of material, which is used with lills to secure down the lace section of the wig. As the lace is delicate and could rip, the galloon acts as an extra layer of protection against the pins.
We have to secure the wig entirely, so lills are pinned all round the hairline. Where there is lace, a galloon is used to protect it, so the galloon is placed on the edge of the lace and normally goes across the front of the hairline (at the forehead) and taken round the sideburns. The lills are inserted into the block through the galloon about half an inch apart, and in a zig-zag shape. This ensures the galloon is secure. Around the back of the wig, at the nape, a galloon is not needed. So the lills are simply inserted evenly until they meet the galloon at the front. If there is any excess left of the galloon once the entire wig is pinned, these are pinned at the front (where the chin would be on the face) so they are kept out of the way.

The following is mine and Debbie's finished blocked wig. From here, this can be washed and dressed accordingly. I've labelled the pictures so you can see each individual part:
Here's a close up of the galloon, secured with lills at the side of the head:

I've enlarged both of the pictures so it is clear to see the lills. I found the process a bit fiddly at first - I kept dropping the lills and jabbing myself with them! - but with practise I'm sure I'll get the hang of it.

More to come next week :) x

Character Makeup - Halloween!

This week we moved on from Straight TV makeup to focus on Halloween - there was a great atmosphere in the class, everyone was really getting into the spooky spirit! At one point there were 2 witches, a zombie and a cat in the hallway, it was an odd sight!

For my research, I wanted to find really unusual characters to create. It's difficult to be original when your choices are skulls, zombies, witches, etc, but I found a few really good pictures for inspiration!
I really liked the interesing mix of characters, and felt like I could create something a bit different with them. When researching for Halloween, I made sure to take note of the facial structures - I specifically chose characters that had a degree of highlighting and shading on the face. For our demo, Bella explained that the main skill we're learning to perfect here is how to change the shape of the face using highlighting and shading in a variety of ways - this is especially useful for Halloween characters, as the technique can be used to make a zombie face look gaunt and sunken, or the bones of a skull look like they're jutting out, etc. She told us how to do this with several different colours as well, so that when it was time for us to practise we would be able to create looks without limiting our colours. To highlight and shade, a mixture of black, grey, brown, white, and even yellow, red and green are used, and, if done correctly, can really create an interesting effect.

The following is my first attempt at Halloween makeup, done on my lovely model Leeanne:
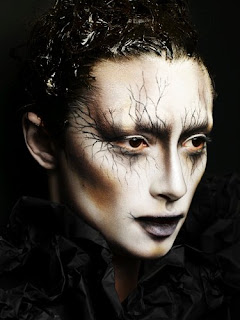
I don't want to sound conceited, but I was really pleased with how this look turned out, and Bella didn't have a bad word to say about it either! It's based on the witch character above (first picture), which I found on the Illamasqua website. I love that it's a witch, but an unconventional one. To create this, I used greasepaints and applied using a sponge and brushes, then set it all with powder. I used a mixture of white, brown and black to create the look. I wanted her cheekbones to really stick out, so I shaded with brown just under the cheekbones and used my fingers to blend. I did the same on her temples, nose and chin, just to give her really sharp features. By shading dark on either side of her nose, I feel like it makes it look longer and thinner, and more witch-like. The eyes were the most diffcult part - as you can see from my research, the eyes have a winged effect and are darkened in at the nose to give her an evil look, so I tried to recreate this as best I could. I used brushes and my fingers, and I found it to be really delicate work! A steady hand is essential! I feel like I ended up with a very good effect, and I'm really happy with the blending and symmetry on her eyes. To finish, I used black on her lips with a dab of brown in the middle. To give them extra depth, I went beyond the natural line on the cupid's bow. Finally, I used a very thin brush to create the lightning bolts around her eyes and lips.

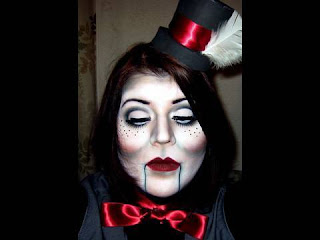
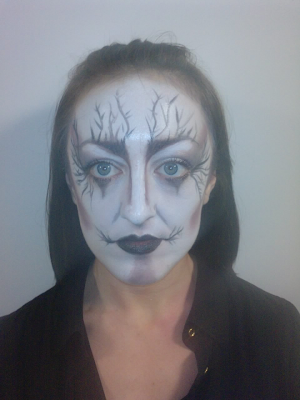
For my second attempt, I decided to do the creepy ventriloquist's dummy (the last picture at the top there). I was ready for assessment after doing the witch, but I felt I needed more practice on something very different before being assessed. Again, I used greasepaints, a sponge, brushes and my fingers to create the following:
I really loved doing this character, but I'm not as happy with it as the witch. I feel my symmetry is a bit off - if you look at the picture, you can see that the left side of her face (our right) has a few messy bits and my lines are a bit squinty, particularly on the eyelashes. But I still enjoyed doing it, and there are parts of the face that I really like! The cheeks for example, I spent the most time on because I wanted to get the shading just right. Bella suggested that next time I make her cheeks a bit redder, but apart from that I'm happy with them - I wanted to make her cheeks stick out, and the overall look is meant to reflect the plastic/wooden doll effect, and I think I captured that. I'm also really happy with her eyebrows (although the one on the left side needs to be tidied up for next time) and lips. As before, I exaggerated her natural lip line to make them more prominent. The black lines on her chin are meant to be the mechanism on the dummy which allows it to 'talk', and I do like the effect, but I need to straighten them up next time. Bella also suggested that I try doll-like lips next time, instead of filling in her whole lip area. I would like to try this to see how it would change the look, but also because it might be easier to make the lines straighter if I'm not having to go over the natural curve of her chin.

I really enjoyed Halloween week, it's been great to try something a bit more creative! More to come next week, assessment day!

Happy Halloween! :) x

November 01, 2011

Halloween Characters

1.) Sally (The Nightmare Before Christmas)

Sally's look can be created simply using makeup. Her face is really pale, so I would use white greasepaint with a hint of blue in it, to give extra depth. Because the character was made with plasticine, her face is really flat - but if I was creating this look for someone I would use navy or dark grey colours on the cheeks to accentuate the cheekbones and create a sunken effect. I would use the same colour on the crease of her eyes and take it upwards towards the brow to make her eyes look bigger but sunken, and I would cover the eyebrows to give her a creepy effect. Sally has massive eyelashes, so I would use fake eyelashes and clump them together so they looked really long and spidery. For her lips, I would paint them a dark wine coloue and accentuate the cupid's bow, and the stitches by her mouth could be created simply with black greasepaint and a thin brush.

2.) Creepy Ventriloquist Dummy

Ventriloquist dummies are really creepy, and always effective for Halloween. The makeup for this is relatively simple to do, and it's all about accentuating the eyes. As you can see from the picture, his eyes are really big and staring (this is probably what makes them so freaky!), so this can be acheived with clever shading. Firstly, I'd make the skin really pale and add freckles on to the cheeks. I'd add dark shading under the cheeks to make them look really round, and accentuate the apples using very subtle pale pink blusher.
To make the face look extra sculpted and plastic-looking, I'd add shading down the nose and make the eyebrows really black and sculpted. I'd also shade down the space above the cupid's bow. Using the same dark colour, I'd add shadow round the eyes - instead of applying it straight on to the lashlines, I'd leave a white space then start shading. This will make the eyes look really big and bright, like doll's eyes. I'd also apply fake eyelashes to the top and bottom for extra effect. For the lips, I'd use a bright true red and apply it generously to the lip, accentuating the cupid's bow. To create the chin, I'd simply use black greasepaint or eyeliner and set the whole thing with powder to it stays in place.

3.) Nosferatu


The ultimate movie monster, and a really great look to create with makeup! The actor would have to wear a bald cap to cover his hair, and this would be blended seamlessly with his skin. For the face, I would have to use a mixture of makeup and prosthetics. I'd start by making the skin really pale with a slight yellowy tinge. I'd also make the eyebrows look really dark and thick (this could all be done using greasepaints, and set with powder). For his eyes, I'd simply line them with black pencil and make it look really smoky by using a smudger brush. I'd enhance the dark circles under his eyes by using grey greasepaint, blend it and set with powder. Finally, prosthetic ears and a prosthetic nose would be fitted, along with a set of large, sharp teeth (which would stand out better by making his lips the same colour as his skin) to finish this horrifying look!