September 30, 2011

Top 5 Makeup Products

1.) Urban Decay's Naked Palette
The Naked Palette has become one of the most sought-after products in the beauty industry. It is always in constant demand because it is a high quality palette and sold for a very reasonable price. There are 12 shades in an attractive faux-velvet case, complete with mirror and a brush, and prices range from £28 to £35. The palette is available from Debenhams and House of Fraser (occasionally you're required to go on a waiting list to buy it), however it is sometimes available on eBay for much higher prices - and people will pay them!
The shades are a highly pigmented mixture of shimmery and matte, and they range from natural, nude shades to dark browns and greys. Many looks can be created with the palette - it does everything from barely-there to work-appropriate to dramatic smoky looks for Friday nights!
This is one of the best products I've ever used - I've had mine for 4 months and I use it every day, so far I've barely made a dent in it! Definitely the best £30 I've ever spent.


2.) Soap & Glory Hocus Focus Visual Flaw Softening Lotion

Soap & Glory's Hocus Focus is described as an "instant flaw softening lotion with long-wearing lightscramble lumishperes". In everyday terms, it is essentially a lightly shimmery lotion which can be applied either straight on to the face or mixed with foundation/tinted moisturiser to add a subtle glow to the skin. The texture is lovely - soft and creamy with a pearlised effect, and it has a nice fragrance. When applied to the skin it illuminates as well as softens, and makes the skin look dewy and glowing. It also evens out skin tone and hides any blemishes or minor flaws. Sold at stores such as Boots and asos.com at £13 for 30ml, this product is also really good value for money - a little goes a long way so the bottle lasts a good while, and looks great on my dressing table!


3.) MAC Russian Red Lipstick


MAC is my all-time favourite brand for lipstick. I have quite dry skin and lips, so I always find these lipsticks really nourishing as well as highly-pigmented and long-lasting. Russian Red is the perfect red lipstick, in my opinion - it is a classic pillar box red, so it has a timeless quality and the ability to suit all skin tones. I've tried my fair share of red lipsticks, but I had never been able to find a true red; I usually end up with shades that are either too dark, such as brick reds, or too pale. Russian Red is exactly what I've been looking for, and at £13.50 for 3g - which, again, lasts ages! - it is a great product and excellent value.


4.) L'Oreal True Match Foundation

As with lipstick, it took me a while to find a foundation which both suited my skin tone and nourished my dry, sensitive skin. L'Oreal's True Match is a liquid foundation which claims to work with your natural skin tone to achieve a shade that's personal to you. I definitely think it works for me - I use one of the palest shades and it glides on easily and blends really well. I like to go for a matte effect on my skin, and True Match does this, while still giving my skin a radiance which I have never had with any other foundation. Prices range from £8 to £9.99 for 30g, it doesn't break the bank, and I'm always willing to pay extra for a product that really works!


5.) Maybelline Falsies Mascara


Mascara is always a tricky product to judge when buying. Many brands promise different things, and, because everyone's lashes are different, finding the right one for you can be a long and expensive process! However, Maybelline's Falsies Mascara is the perfect mascara for me. It promises length and volume, with high colour payoff, and it definitely delivers on all of these. At £8 it is about average for a high street brand mascara, but for me this is a bargain because it suits my lashes and is adaptable for both everyday wear and nights out. I use the waterproof version in Black, and my only criticism would be that it isn't the easiest mascara to shift at night, although this might be down to my makeup remover rather than the mascara. I have naturally long lashes anyway, but with 2 layers they are noticeably larger and thicker, without clumps or flaking. The product lasts all day and the waterproof version is especially good value for money because it also prevents the mascara from running. A great product which I will buy again!


Gill :) 

September 29, 2011

Character Makeup - Straight TV 3

This week I did my Straight TV (female) assessment and passed! Just need to do Straight TV and Theater (male) and Straight Theater (female) now. It went really well, on my face sheet Bella commented that it was good work and that I completed it in a commercially viable time, which is great!

Take a look at the finished product:


I used really natural shades on Kirsty, and managed to get the right amount of product on her eyes so it didn't look too overdone. As you can see, I highlighted her eyelids and brow bone with a lighter shade, and blended the brown shade upwards and outwards from the crease to really open her eyes. I lined her upper lashline with a small amount of dark brown (almost black) eyeshadow, which turned out really pretty and subtle, the way I wanted. I also blended the multitonal effect on her lips better this time and managed to mix the right colour to line them with. Her blusher turned out really well also - I went for a more pink shade rather than the peachy ones I had been using, and I feel it really brings out her cheekbones as well as warming her skin. The foundation I used was a bit greasy on her skin initially, but I managed to blend it really well and I toned down the shine with some translucent powder, which gives her a nice glow.

I'm really happy with the outcome, I just need to practise my theater makeup now and hopefully I'll be ready to get assessed in a couple of weeks!

Gill :)

Wig Making - Wig Wraps

This is my first ever post about Wig Making class, because we've really just been practising over the last few weeks! But I did my Wig Wrap assessment on Monday and I passed :) More good news!

Wig wraps are essentially a mould of the head which are passed to wig makers, and they are made so the actor's wig fits them perfectly.
We start by pin curling the entire head, using kirby grips. We use kirby grips because they act as an achor for the wig, and they must always face towards the back of the head so as not to damage the lining of the wig. The hair at the front of the head is pin curled away from the hairline, so we can properly measure the hairline and so the hair at the front is pulled out of the way.

Once this is finished, we lay a large sheet of cling film over the head - usually the client helps hold it in place - and secure it at the nape of the neck and forehead with sellotape to hold it in place. From there, the process of moulding begins. The head is essentially taped all over so the shape of the head can be created. This is done by applying a few layers of tape. At the end, the shape of the head should be clearly defined, and there should be some excess cling film at the forehead, nape and ears - if, when applying tape, the cling film shrinks back and stops covering the hairline, then a larger sheet is required over the top.

Finally, we use marker pen to draw round the hairline. This process has to be exact, so that the wig will fit accurately and cover the original hair properly. From there, the excess cling film is cut off and we are left with a head-shaped mould which should fit the head, cover all hair and be tight enough to stay on.

Here's my wig wrap I did on John:


As you can see, the entire hairline is covered at the front to hide his natural hair. The wrap was done quite tightly, but not enough to be uncomfortable - this is seen in the top picture, the wrap fits snugly on his head.

I'm happy I passed the assessment, especially because I had been off and missed the demonstration!

More to come soon :)

Gill

Special Effects - Burns 3

Yesterday I did my burns pre-assessment, and - good news! - Mo told me I'm ready to be assessed :) She was judging us on our product knowledge, time management, understanding of colour and overall result, so I'm really happy that she said I'm doing well on all those things. The scenario for our assessments is a house fire, so again I decided to do a fire burn. It went really well, I even managed to finish before the allocated time was up!

Mo recommended we have a back story to our burns so we can fully understand the kind of effect we want to end up with. So, I decided that Debbie was straightening her hair and dropped the straighteners - but instead of letting them fall she caught them by the blades and one of them burned her hand.

Take a look!


In my camera's light it looks quite brown, but I really layered on the black to emphasise how badly burned the skin is. I used a mixture of greasepaints, latex, tuplast, collodium and vaseline to create the overall look.

I'm really happy with the way it turned out, especially the way the skin is peeling around the wound! Can't wait to do my assessment now, I'm feeling quite confident about it :)

Hope you like it!

Gill :)

Special Effects - Burns 2

Last Wednesday I did my second attempt at a skin burn. It turned out really good in the end, but getting there was difficult as I had a bit of a Gelatin disaster halfway through! I was trying to create burnt scabs but they stuck out too much so they looked really fake. I managed to remove them and redo the area but I was worried because it took more time than would be allocated for assessments. Here's the picture and I'll explain the effect I was going for!


So this was another fire burn, and this time I wanted the first few layers of skin to look like they had peeled back to reveal the flesh underneath. I used plenty of latex and folded it back, then sealed it with collodium - this also made the skin around the wound look crinkly, and some parts even started hanging off and flaking which added to the effect! I applied plenty of black colour on the skin to make it look really charred and dead.

For the wound inside, I was trying to create scabbing but it didn't work - when I took the Gelatin off I redid the area with bright reds and applied a layer of vaseline to make it look shiny and sore, and again applied some collodium which was painted black to add more texture.

Hope you like!

Gill :)

September 27, 2011

Style Icons

When Emma asked us to research our style icons I found it quite difficult because I don't particularly idolise people simply because of what they wear or what they look like - I look up to people because of their talent, humility, grace and personality. I've never really thought about who my style icons are because I tend to just wear what I suit and what I'm comfortable in. Like everyone else, my mood changes all the time and my clothes and makeup reflect that! So, instead of "style icons", here are some people I think are beautiful :)

Anne Hathaway

Anne's look calls back to the screen sirens of the Hollywood Golden Age, in that she always maintains a classy, elegant and feminine style. She always chooses outfits which are on-trend but classic, and she always dresses to flatter her womanly shape – it is this which gives her style a timeless feel. Her chestnut colouring combined with her flawless, pale skin means she suits almost any makeup look. The look I favour most on her is a black lined eye with classic red lips, however she can also carry off a more toned down look due to her natural beauty. Her large brown eyes and full, heart-shaped lips are the perfect canvas for any makeup artist.


Drew Barrymore


Drew inspires me because, like Anne Hathaway, she always looks classy and feminine and keeps her style unpretentious and down to earth. However, Drew always has a quirky edge to her various looks, which she carries through both casual and formal occasions. She always looks on-trend, but at the same time she keeps her style fresh and original by allowing her quirky taste to shine through. She has a very unique and unusual face, which is ideal for any kind of makeup – her lips in particular suit almost any shade. Her pale skin, fair colouring, stunning face and relaxed, kooky style makes her, in my opinion, the ultimate underrated beauty.


Marilyn Monroe
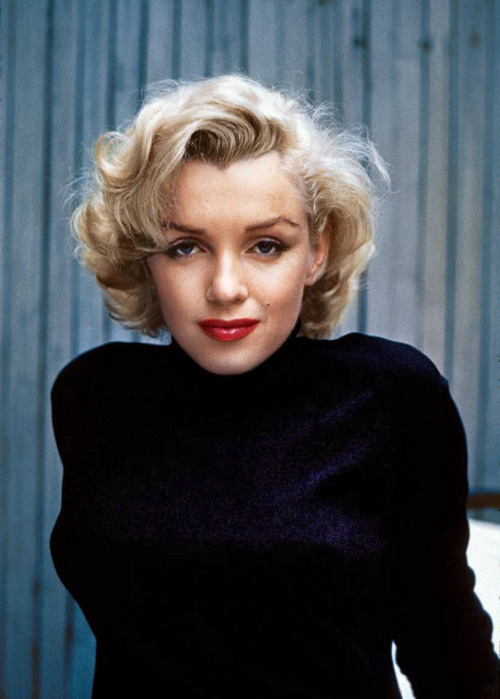
For me, Marilyn Monroe is the ultimate woman – she had the classic hourglass figure, an unforgettable face and a style all of her own. Her long, dark eyelashes, statement red lips and cascading blonde curls have proved to stand the test of time – even now, modern starlets such as Christina Aguilera and Scarlett Johansson have emulated her style, and her simple but glamorous look has never gone out of fashion. Her flawless skin, expressive eyes and megawatt smile meant that she did not need much makeup or styling to look beautiful, in fact some of the most iconic photos of her are more relaxed and intimate. Despite this, she suits almost any style; from ultra-glam on the red carpet, to casual in relaxed photoshoots, to outrageous, glitzy costumes seen in movies such as Gentlemen Prefer Blondes. She was unique in that her style defined her – this was not always a good thing, as she almost became a caricature of herself when in fact she was more shy and vulnerable behind the scenes than people expected. However, her look became synonymous with glamour, femininity, strength and sex, and to me she is an icon because no other woman in the 20th century made such an impact on the world of fashion and beauty as Marilyn did.

September 22, 2011

Character Makeup - Straight TV 2

This is my second attempt at Straight TV makeup, again it's the female version!
I worked with Shona this time, and she has a longer face and slightly darker skin compared to Debbie, so despite it being the same look it was great to practise it on a different person as I had to find slightly different products. I decided to do roughly the same shape on the eye, as I feel it really opens the eye with the right amount of blending and colour applicaton. I did a few things slightly differently, as I took note of Bella's tips from last time!

Take a look at the picture, with and without flash:


Unlike last time, I applied a small amount of dark brown (almost black) eyeshadow along Shona's upper lashline to really bring out her eyes - this look is subtle but very effective. I also took Bella's advice from before and lined Shona's lips along the top and bottom. Combined with the slightly darker pink areas at the corners of her mouth, this gave her lips extra fullness and enhanced her natural shape.
I also applied mascara to her top and bottom lashes, which I feel really finishes the look off.

In the photos without flash, Shona looks a bit pale - I applied a pinky peach blusher to add warmth to the skin and bring out her lovely cheekbones, but I think I need to add a little more next time.
Overall though, I am happier this time with how the look turned out, in particular the eye look. I always like to blend outwards and upwards to open the eyes, and the winged effect makes Shona's eyes look much wider. I also managed to keep the eyes more natural this time, particularly in the crease, where Bella said it was too dark last time.

Maybe next time I would add a small amount of foundation under her eyes in a slightly paler shade to remove any dark shadows, but in general I'm really happy with my final result. I'll be ready for assessment next week I think! :)

More to come soon!

Gill

Special Effects - Burns 1

Special Effects is a great class to be involved in - I love getting as messy as possible and being left to work on really creative projects, so it's definitely my favourite class so far!
For the past few weeks we've been practising skin burns, to a variety of degrees. Our research had to involve burns of different types, such as chemical, thermal, fire, radiation and electric, and we had to make ourselves aware of how the skin is affected by these.

The following is my research, these are all either 2nd or 3rd degree burns, and range from moderate sunburns to serious radiation and fire burns which could potentially disfigure the victim:


Researching burns is sometimes distressing, especially when the burns are particularly severe, but I have a pretty strong stomach and I find it interesting to look at how the skin is affected by different types of burns. Also, I'm looking at them through the eyes of a makeup artist, so I like to observe the different colours and textures.

I decided to try a fire burn on Stephanie's wrist, as I like the way fire affects the skin - in many cases the skin is left hanging off and the different epidermal layers are visible. Also, the skin is usually very charred and vivid colours are revealed.
I used greasepaints, latex and collodion to achieve the effect - take a look at the picture and I'll explain how I did it!

First, using my hand as a palette, I mixed the right base colour. I wanted it to look as fresh and sore as possible so I used a lot of reds, pinks and a little brown. I applied with a sponge and blended on the outside to create a soft edge, therefore making it look more real. Sometimes with burns it's ok to be a bit sloppy or clumsy because a very even shape or pattern could make it look fake - realism is key!


I then applied a couple of layers of latex and let it dry, then added collodion on top. The latex provides an invisible 'skin' which can be peeled, cut, cracked or rolled back to make it look like the person's skin is hanging off, or it can be piled on top of itself to create a thicker layer which can then be manipulated as needed.
The collodion is probably my favourite product to use in Special Effects - it is applied wet, and as it dries it wrinkles and tightens the skin. It can then be manipulated like latex, however it is thinner and not as flexible. I let the collodion get to the tacky stage, then used cotton buds to 'rip' the layers I had added - these then became the charred, wrinkled bits of skin that you can see in the picture.


To finish the look, I added more colour using cotton buds, a soft sponge and a stipple sponge (a textured sponge that applies colour less uniformly), using black to bring out the burnt skin, red to make it look fresh and painful where the skin has peeled back, and a mixture of reds and browns in between to add depth and texture. Finally, to add to the freshness, I layered Vaseline around the fresh-looking areas. I felt this really brought an extra dimension to the burn! 

(excuse the not-great quality of this picture - Santa is bringing me a new camera!)

I was delighted with the final result! I managed to create the effect very quickly - I managed to get my base colour and latex/collodion application correct first time, and it applied the way I wanted, so I feel like this gave me confidence and focus to get the look I wanted.

Keep checking my blog for more fun with gore :)

Gill

Hairdressing - Barrel Curls

In our second hairdressing class we learned how to do Barrel Curls. This method is not unlike Pin Curling, in that the hair is wound round the fingers and secured at the root. Also, like Pin Curling, the desired effect can be changed depending on the size of the sections used.


I found this process to be very frustrating! I definitely found it more difficult than Pin Curling - as I stated in my previous Hairdressing post, I have very clumsy fingers and I struggled with this even more with the Barrel Curls. I will need more practice, as they were a bit messy at first, but the end result made it worthwhile.


As you can see, the Barrel Curls are named because they are pinned in this shape. As with Pin Curling, the hair is wound round the finger(s), but instead of then being pinned flat against the head, I took my fingers out while holding the shape and pushed the pin through the bottom of the curl to secure it in place. It turned out a bit messy, and I wasn't happy with the size of the barrels I had created, but I plan on practising a bit more - I can pin curl much better/faster after a few attempts so hopefully I'll get better at barrels too!


Here is the finished result:


The curls turned out more like waves, but next time I'll make my sections smaller and try to tidy up my technique in order to get a better result :)

Gill

Character Makeup - Straight TV 1

In our Character Makeup class we have been researching and practising Straight TV and Straight Theater makeup. In this post I'll be covering Straight TV, as I haven't had time in class to practice the Theater look yet. That will come in a later post!

Straight makeup for television is the creation of a natural look - it is meant to essentially represent a more enhanced version of the person on screen. This look is used on newsreaders, presenters and hosts in order for them to look healthy and refined. The person's job is to connect with the viewer, so the facial features have to really stand out, while still remaining natural. This is evident from the following research:


As you can see from the pictures, this look is applied to both male and female presenters. For men, the process is more subtle; the skin tone is evened out and the eyes are enhanced by tidying up the eyebrows and applying a small amount of eyeliner underneath the eye. I have yet to practice this look on one of the guys in the class - so far I've done the look on girls, although I would like to try a Straight TV male look!

Also evident in the research is the way women are made to look - their eyes and lips are the main focal points, as they are used to convey a number of emotions and stories. Their colouring is taken into account and the eyes and lips are made up to look very striking but natural at the same time.

I first tried the look on Debbie - she has very pale skin so I chose the lightest foundation shade I could find and applied it all over. I finished by setting with powder and adding a small amount of peach blush to warm the skin. I combed her eyebrows and enhanced their natural shape and colour with a little brown eyeshadow - eyebrows are used to convey emotion so it is important they are enhanced. On her eyes, I applied a base colour which was slightly lighter than her natural skin colour, in order to even out the tone of her eyelids and brighten her eyes. In the crease of her eye I blended in a light brown colour, and swept it outwards towards the edge of her eye and up towards her eyebrow. I then chose a slightly darker brown and smudged it into the crease and down on to the lower lashline in order to give her eyes more definition. I finished the eye by applying the original base colour to her browbone to highlight, and tidied up her eyelid by adding more of the same colour on the lid.
For her lips, I wanted to keep the colour natural but warm, so I mixed my own colour from the palette - it turned out a slightly warmer and pinker version of her natural lip colour, and I applied this all over. To make her lips appear fuller, I mixed a slightly darker version of the same shade and applied it to the corners of her mouth. Observe the final result, with and without flash:


The look turned out as I hoped, however I ran out of time and didn't get the chance to apply mascara - however if I did, I would use black and apply to her top and bottom lashes, to really open her eyes. I asked Bella for her verdict, she said the eyeshadow was a little too dark in the crease, so next time I will make it more natural. She also recommended I use a very dark brown shade and a thin brush to line her top lids, close to the lashes. She showed me an example and it really helped add definition to her eyes, so I will also do that next time. Finally, for the lips, she recommended I blend the darker shade slightly better, and maybe use this shade to line.


For my first attempt at Straight TV makeup I'm really happy with how it turned out. Next blog post will be my second attempt!


Stay tuned :)

Gill

September 18, 2011

Hairdressing 1 - Pin Curling

In both our Hairdressing and Wig Making classes we have learned how to pin curl the hair. For Wig Making, this technique is used to secure the hair flat to the head in order to fit and anchor a wig properly; however in Hairdressing it is used to create bouncy curls. The end result varies depending on the size of the pin curls - smaller ones create tiny, tight curls, and bigger ones create larger ringlets.

I did my pin curls on a training head which I prepared by brushing thoroughly to remove knots. Firstly, I dampened the hair all over; creating pin curls on wet or damp hair allows them to be more intense and longer-lasting, as the blow drying stage sets the style. Pin curling is a very easy way to create a striking look, as all I needed was a tail comb, pins and a hairdryer. From start to finish, the process took about 90 minutes, but as I practice I expect to become more adept at the technique so it will take less time!
This technique involves point to root winding, which means sections of hair are wound in towards the head and secured at the root. I started at the hairline and sectioned off the hair using the tail comb. Initially, I found my pin curls to be quite messy as my clumsy fingers got used to the process, but as I moved along the head it became simpler! I created medium-sized pin curls, as I wanted to achieve bouncy ringlets. My training head had long hair, which made it easier for me to practice the technique, however I did struggle at times with 'stragglers', i.e long pieces of hair that weren't sectioned off correctly, and as I combed the hair these pulled some of my pin curls out. However, I persevered and the head eventually ended up looking like this:


As you can see from the pictures, my pin curls are of varying sizes - this comes with being a beginner, I definitely need to practice the technique and work on making them more evenly sized and spaced!
Once I had finished pin curling the entire head I blow-dried the curls in order to set the style. Again, I need more practice as some of my curls were drier than others. I found it difficult to tell if they were fully dry right in at the root - because the curls are so close to the head, more time is needed to be spent thoroughly drying them individually. Despite struggling initially and making a few mistakes, I was very happy with the way the style turned out:


I managed to achieve the large, bouncy curls I had envisaged before I started - however, as mentioned above, a tighter style can be achieved by making the pin curls smaller. From this point, the hair can then be dressed and styled as needed, depending on the entire look which is trying to be created.

I found the pin curling to be difficult at first, but as I moved across the head I was able to do it faster and neater - it is definitely a technique that requires practise! Next time I would make the pin curls smaller, and take photos to compare the difference - it is a look which can be adapted and varied, which is why I enjoy the end result so much. I plan on practising the technique more, both for Hairdressing and Wig Making class, on different lengths and styles of hair.

Watch this space for more of my work, I have had an interesting couple of weeks at college so my photos shall be added in due course!

Gill :)

September 16, 2011

First Blog Post!

Welcome to my blog!

I will be using this blog to chart my progression throughout the NQ6 Media Makeup course. I will be posting written material, research and photos of work I have created in class. The material on my blog will cover all aspects of the Hairdressing, Wig Making, Character Makeup and Special Effects courses - I look forward to expanding this page and I hope you all enjoy following my progress!

Gill :)