For the past few weeks we've been practising skin burns, to a variety of degrees. Our research had to involve burns of different types, such as chemical, thermal, fire, radiation and electric, and we had to make ourselves aware of how the skin is affected by these.
The following is my research, these are all either 2nd or 3rd degree burns, and range from moderate sunburns to serious radiation and fire burns which could potentially disfigure the victim:


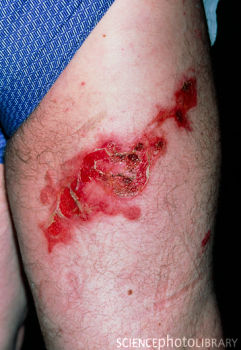
I decided to try a fire burn on Stephanie's wrist, as I like the way fire affects the skin - in many cases the skin is left hanging off and the different epidermal layers are visible. Also, the skin is usually very charred and vivid colours are revealed.
I used greasepaints, latex and collodion to achieve the effect - take a look at the picture and I'll explain how I did it!

First, using my hand as a palette, I mixed the right base colour. I wanted it to look as fresh and sore as possible so I used a lot of reds, pinks and a little brown. I applied with a sponge and blended on the outside to create a soft edge, therefore making it look more real. Sometimes with burns it's ok to be a bit sloppy or clumsy because a very even shape or pattern could make it look fake - realism is key!
I then applied a couple of layers of latex and let it dry, then added collodion on top. The latex provides an invisible 'skin' which can be peeled, cut, cracked or rolled back to make it look like the person's skin is hanging off, or it can be piled on top of itself to create a thicker layer which can then be manipulated as needed.
The collodion is probably my favourite product to use in Special Effects - it is applied wet, and as it dries it wrinkles and tightens the skin. It can then be manipulated like latex, however it is thinner and not as flexible. I let the collodion get to the tacky stage, then used cotton buds to 'rip' the layers I had added - these then became the charred, wrinkled bits of skin that you can see in the picture.
To finish the look, I added more colour using cotton buds, a soft sponge and a stipple sponge (a textured sponge that applies colour less uniformly), using black to bring out the burnt skin, red to make it look fresh and painful where the skin has peeled back, and a mixture of reds and browns in between to add depth and texture. Finally, to add to the freshness, I layered Vaseline around the fresh-looking areas. I felt this really brought an extra dimension to the burn!

(excuse the not-great quality of this picture - Santa is bringing me a new camera!)
I was delighted with the final result! I managed to create the effect very quickly - I managed to get my base colour and latex/collodion application correct first time, and it applied the way I wanted, so I feel like this gave me confidence and focus to get the look I wanted.
Keep checking my blog for more fun with gore :)
Gill
No comments:
Post a Comment